RabbitMQ — How to send delayed/scheduled messages for Webhooks with exponential backoff?
I wanted to use RabbitMQ for sending the webhook notifications to the clients with exponential backoff if they fail to receive the notifications.

There are many use cases of scheduled or delayed messages, and I wanted to use RabbitMQ for sending the webhook notifications to the clients with exponential backoff if they fail to receive the notifications.
But, RabbitMQ uses the AMQP protocol that doesn't have any native feature to send scheduled or delayed messages. But there are ways to implement this:
- Use a community plugin
rabbitmq_delayed_message_exchange(not recommended for production environment) - Use Dead Letter Exchange with message TTL.
Let's look at the community plugin first.
Community Plugin
If you want to jump to the implementation, you can read this article. If you don't care too much about the timers you can go ahead with this very simple solution. But you need to think twice before using this in the production environment.
You can go to the plugin's Github repository and check the limitations. While writing this blog, it has one particular limitation that may bring inconsistencies to your application:
If something happens to the RabbitMQ server or it restarts, your timers are lost. That means if you set the message to be sent after a minute, an hour, or maybe a day and something happens to your servers, the messages are being consumed immediately once the server comes up.
I found the Dead Letter Exchange with Message TTL approach significantly better than this plugin (Of course there are some limitations but at least this approach brings more consistency).
Using Dead Letter Exchange with Message TTL
To understand this approach, you must check out the links above to understand what are these two items. I would summarise the approach here.
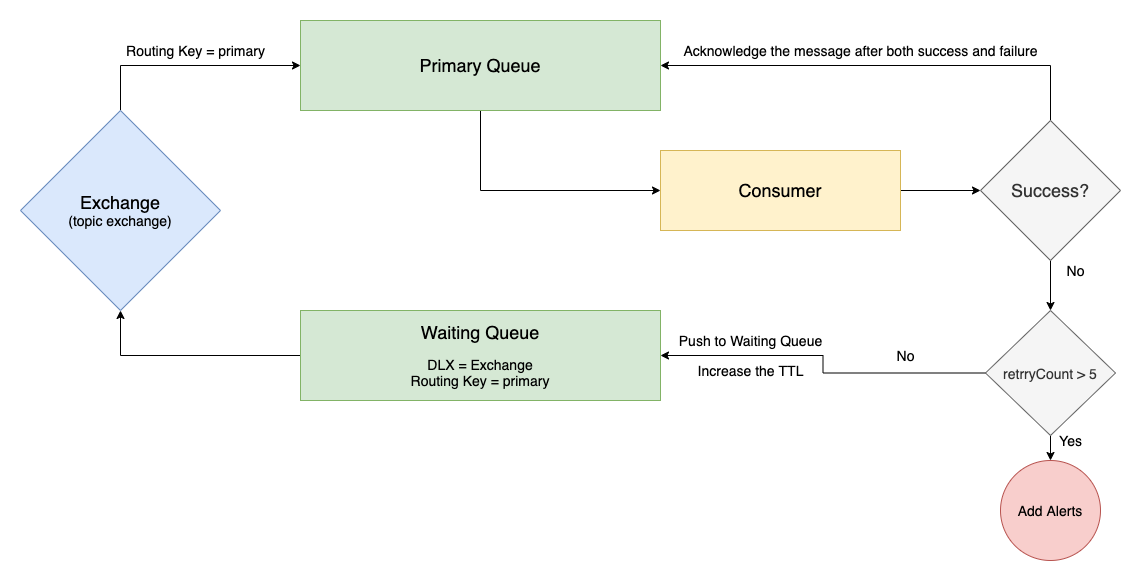
It requires 2 queues (let's call them primary queue and waiting queue) and 1 exchange. For the particular webhooks use case, I decided to use this approach:
- Keep pushing the messages to the primary queue.
- Try to send the notification to the clients immediately.
- If you don't get success, add the TTL and push it to the
waiting queue. - After that specific TTL, messages will be routed to the
primary queueusing the Exchange and can be consumed for trying again. - Keep increasing the TTL after each retry to achieve exponential backoff in case of failure.
If you don't want to send them immediately, you can skip the first 2 steps and directly insert the messages into the waiting queue.
Now, if we draw a diagram, it would look something like this (Don't get overwhelmed by this diagram):
To keep this simple and straightforward, I don't want to code this in any particular language. Instead, I'll use the Management Dashboard.
Implementation using Management Dashboard
Step 1: Create a Virtual Host
After logging into the Management Dashboard, create a virtual host if you haven't already. I generally prefer to create a virtual host because it provides logical grouping and separation of the resources.
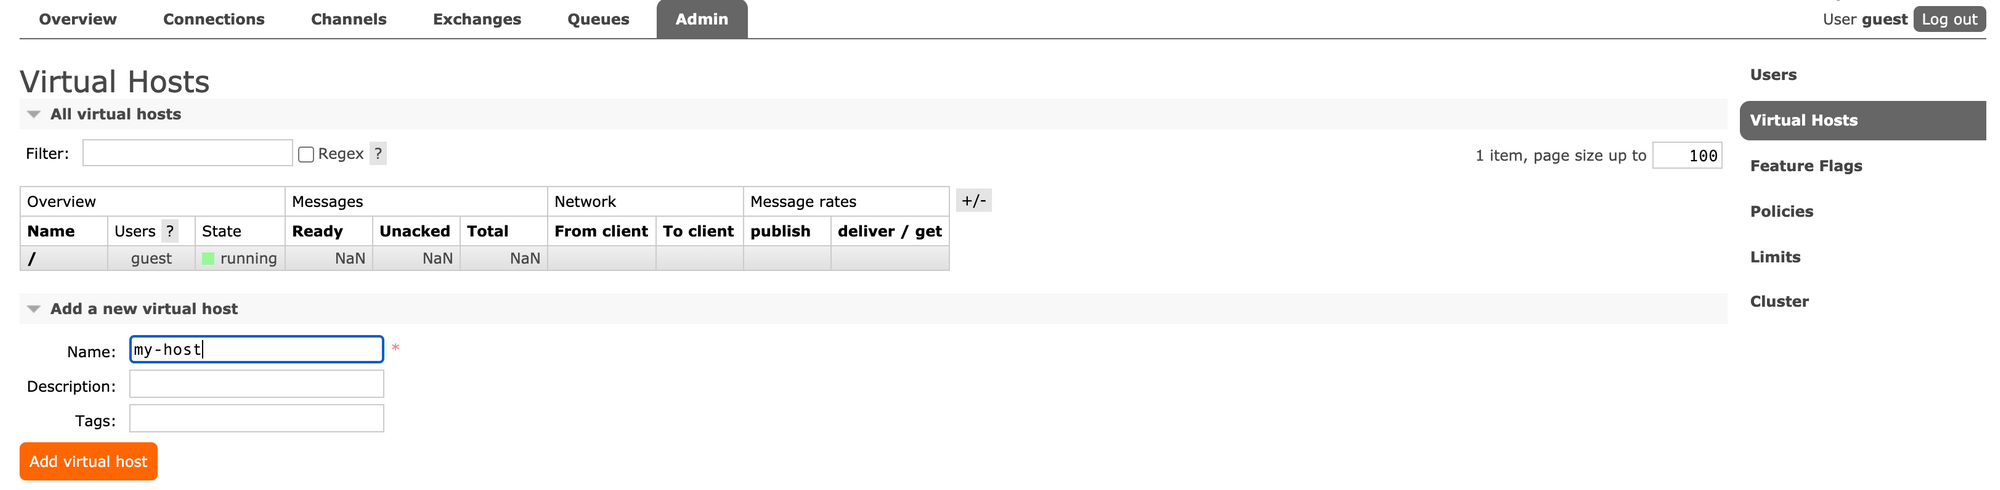
Here, I created a virtual host named: my-host.
Step 2: Create an Exchange
Now, go to the Exchanges tab and "Add a new exchange".
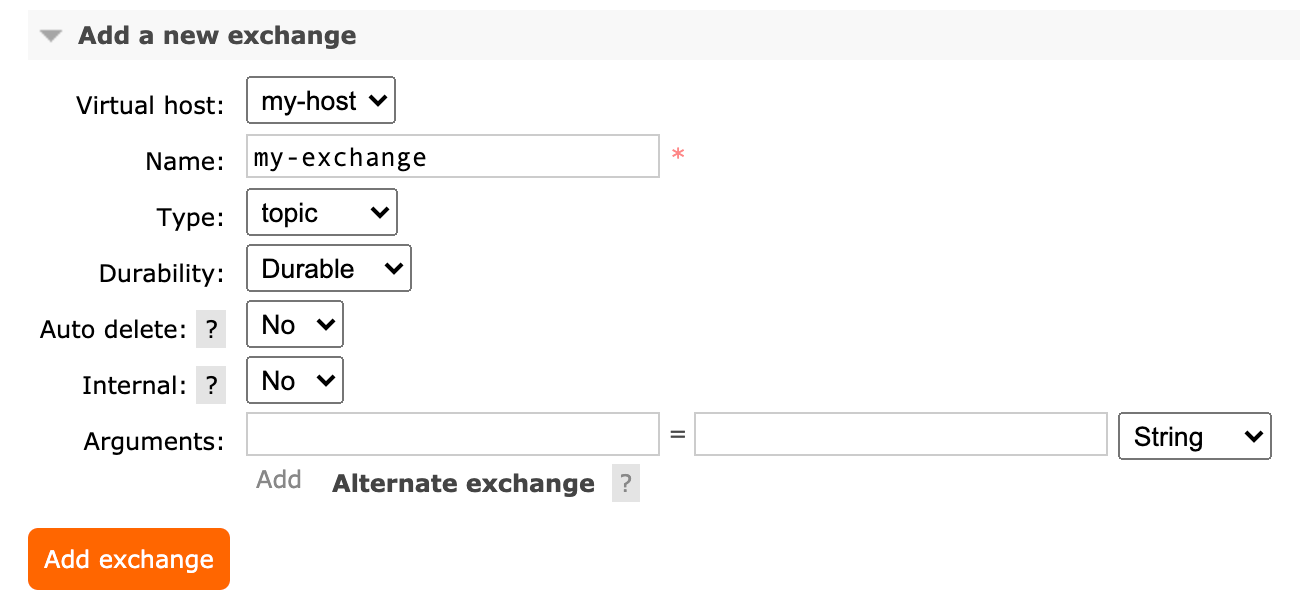
- Select the Virtual host:
my-hostor whatever virtual host you just created in step 1. - Add a name of your exchange. Here, I put
my-exchange. - Change the Type to
topic. (Discussion on what type of exchange is out of scope for this blog)
Step 3: Create Queues
As we discussed above, we need to create 2 queues. To do that, go to Queues tab and "Add a new queue".
For the first queue, you just need to configure these 2 fields:
- Virtual host:
my-host - Name:
primary-queue
For the second queue,
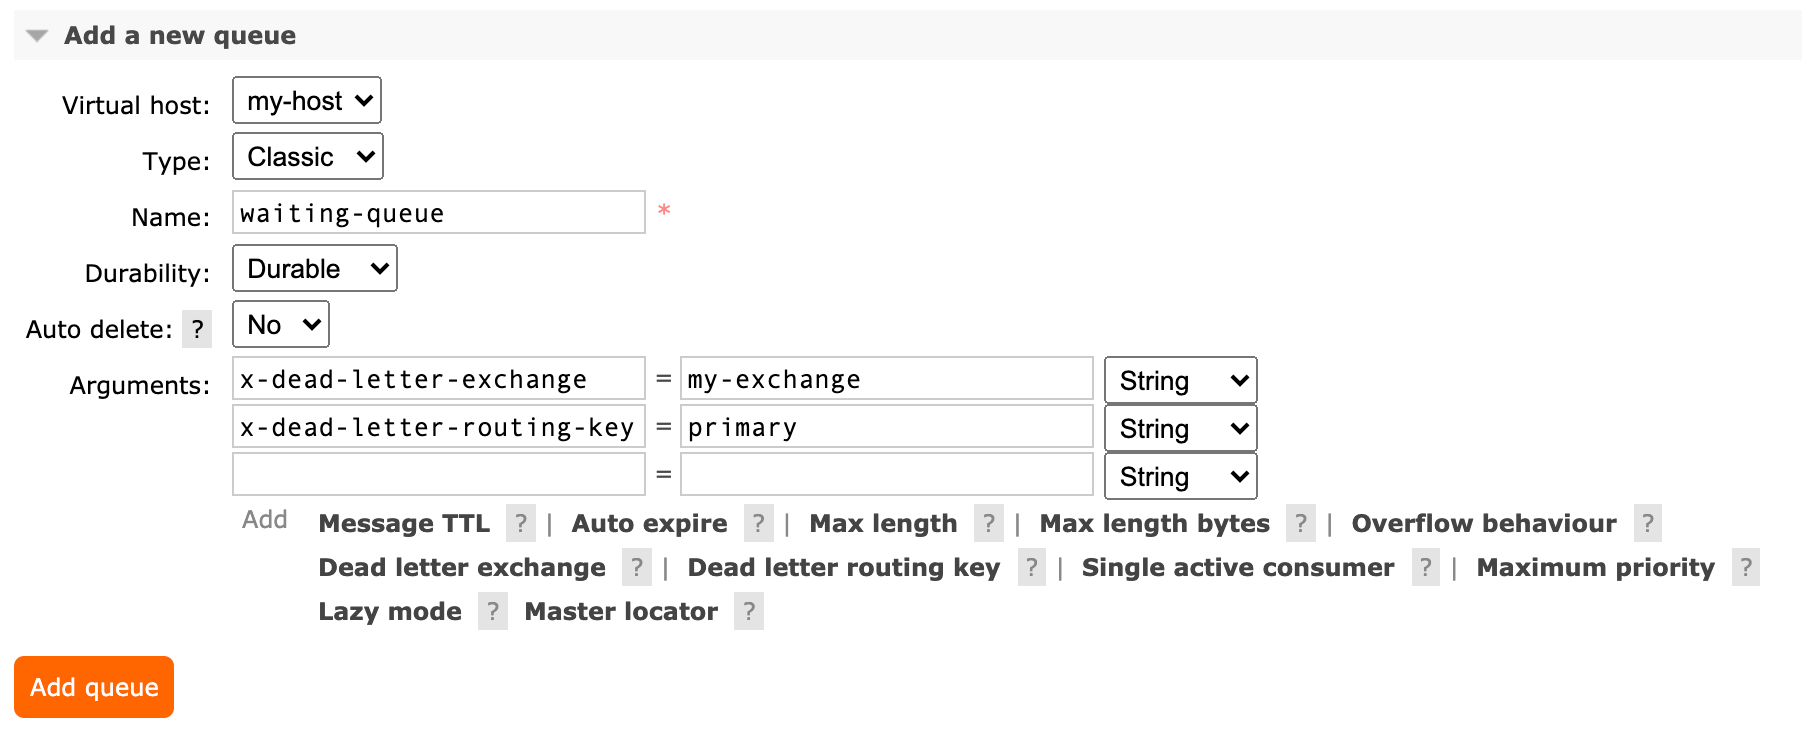
- Virtual host:
my-host - Name:
waiting-queue - To add the Arguments, click on
Dead letter exchange, set the value:my-exchange. - Click on
Dead letter routing key, set the value:primary.
Step 4: Set up Exchange Bindings for Routing
After creating these 2 queues successfully, again go to Exchanges tab and click on the exchange that we created in step 2. In my case, it's my-exchange.
Now expand Bindings and add the following details:
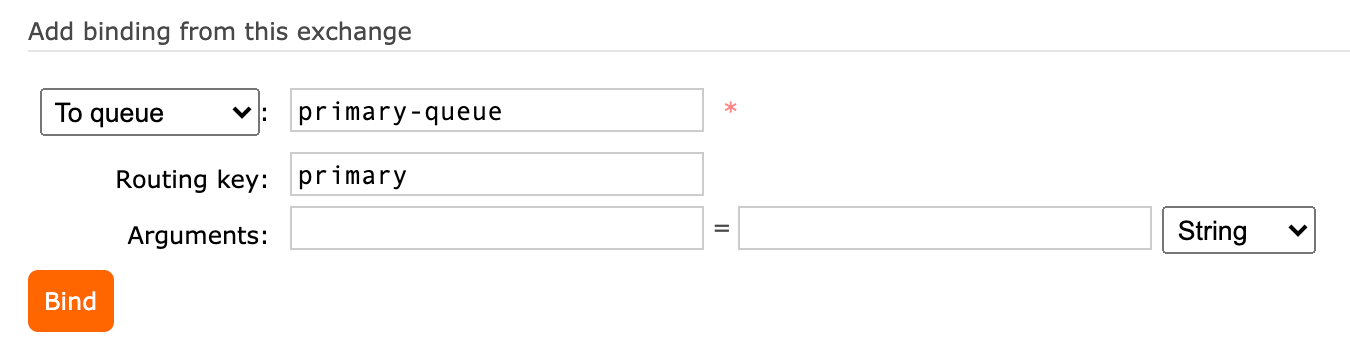
- To queue:
primary-queue - Routing key:
primary
That's it.
Let's test our configuration
To know whether this routing is working properly, we'll publish a message to the waiting-queue with TTL of 10 seconds. That means, the message will stay in the waiting-queue only for 10 seconds and then it'll move to the primary-queue.
Publish a message to the waiting-queue
Go to Queues tab and click on waiting-queue. Now expand the "Publish message" section and add the following details:
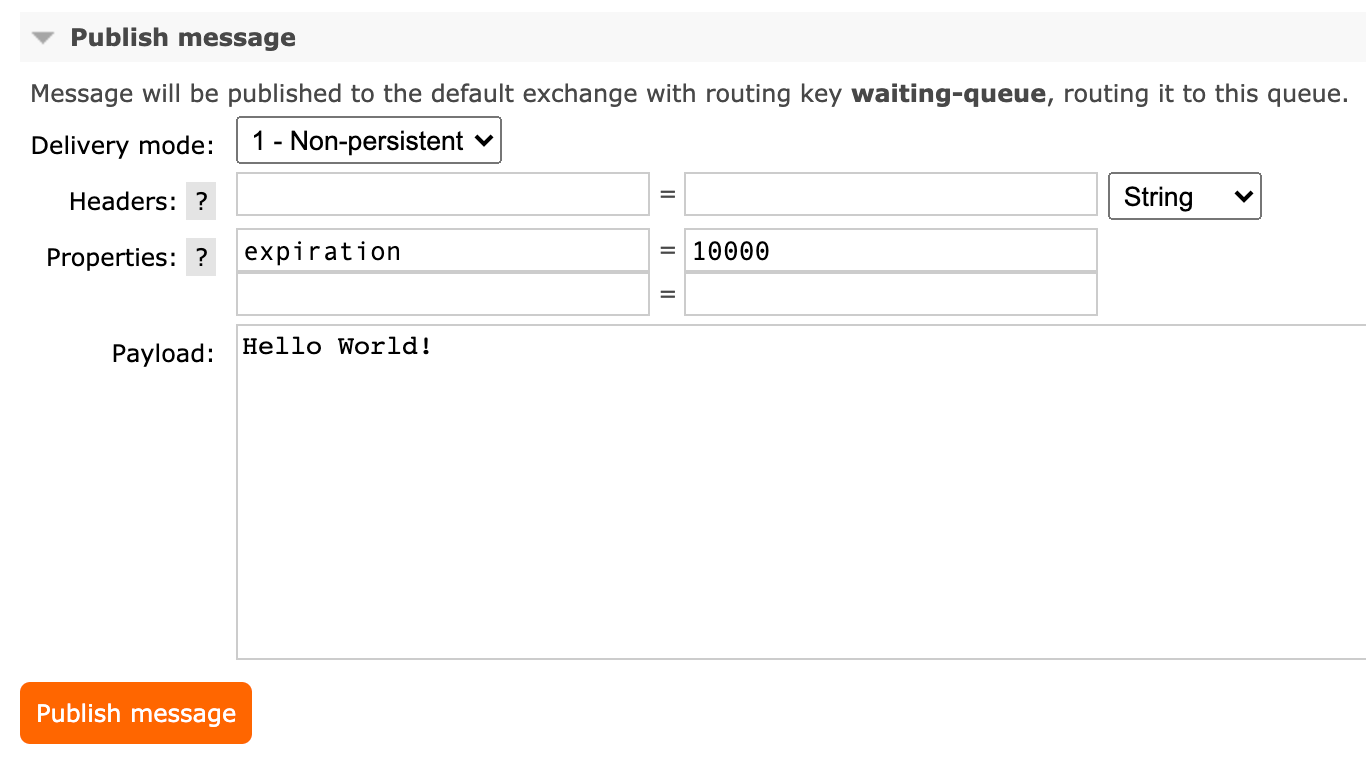
- In "Properties", add
expirationand set its value to10000(10 seconds). This means the message will stay in the waiting-queue for 10 seconds. - Add any message in the "Payload" section. Here, I've put "Hello World!".
Monitor
Now again click on Queues tab. If you don't see any messages in the waiting-queue, refresh the page. If you've configured everything properly, after 10 seconds, you'll see that the same message is now in the primary-queue.
To achieve exponential backoff, you can simply increase the expiration time of the message on each retry.
Common mistake
Creating only 1 waiting queue
While achieving exponential backoff, if you keep increasing the expiration time and publish messages to the same waiting queue, you'll notice that some times your timers are not working properly.
If you've read the message TTL link I shared in in the beginning, there is a section: per message ttl caveats. It says that your messages will expire and go to the dead-letter queue only when they reach to the head of the queue.
For example, you've published a message with the expiration time — 1 hour. Now if you publish a message to the same waiting queue with the expiration time — 1 minute, the second message (with expiration time 1 minute) will only expire (and go to the dead-letter queue) after 1 hour.
Footnotes
After configuring and playing with these values in the Management Dashboard, you can easily code this in any language you want. If you like this topic and the article, do let me know on Twitter and share the knowledge with everyone.